Outbrain is one of the world’s most popular native advertising platforms. Thousands of advertisers are already taking advantage of using it, so why miss your chance?
Whether Outbrain will be the platform you’ll use to launch your very first native ad campaigns, or you just want to access a wider inventory, the platform will help you meet your goals. In this post, we’ll tell you what to expect from Outbrain, highlight its benefits, and guide you through the process of native ad campaign creation.
- What is Outbrain?
- How do Outbrain widgets look?
- Outbrain ads formats
- Outbrain carousel ads
- How much does Outbrain advertising cost?
- Outbrain vs Taboola
- How to set up your first Outbrain campaign?
- Bid strategies
- Budget types
- Outbrain targeting options
- Outbrain campaign tracking
What is Outbrain?
You already know it’s one of the most popular native ad platforms, but this doesn’t help much. So, here’s a more detailed definition of Outbrain:
Outbrain is a content discovery platform that connects advertisers and publishers, allowing them to trade ad inventory programmatically. The platform enables advertisers to access its premium publisher network and display their native ads in the form of content recommendations across thousands of the web’s largest sites.
Outbrain gives you access to 290 billion monthly impressions across 55+ countries. With its advanced targeting options, you’ll reach the most relevant audiences and achieve the goals set.
This content discovery platform partners with top publishers, such as Fox News, CNN, Daily Telegraph, Mashable, The Guardian, and even more. But to have your ads displayed there, you’ll need to follow strict guidelines Outbrain provides to ensure their network is filled with quality content.
How do Outbrain widgets look?
If you’ve ever visited news websites (and you have), you’ve seen Outbrain’s widgets with content recommendations. This is how your ads will be displayed if you run campaigns with Outbrain:
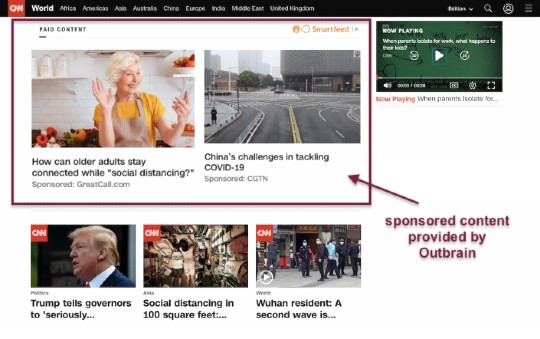
Just like other recommended articles on the page, Outbrain ads consist of an image and a headline, with only one distinctive feature added – a brand logo. Fitting into the editorial content flow, these ads are turning readers into engaged audiences.
Outbrain ads formats
With Outbrain, you can distribute different ad formats. It supports image ads, video ads, and text ads.
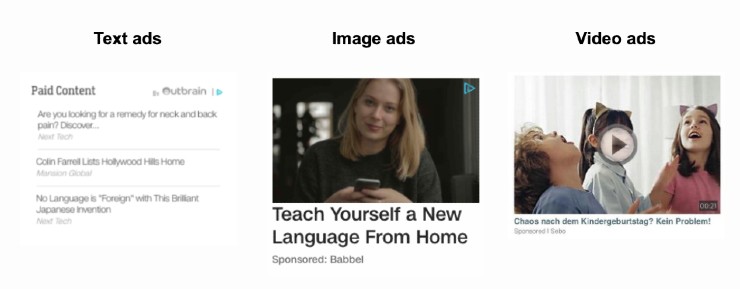
The company recently announced the launch of an interactive Carousel format. Instead of selecting only one message per ad, you can add up to 10 images and titles per carousel now.
Outbrain carousel ads
This format allows advertisers to promote a wide range of products, introduce different features of one product, or leverage the power of storytelling, showing a sequential story in a carousel.

This format is available only for mobile campaigns. We’ll show how carousels are created in the further sections.
How much does Outbrain advertising cost?
And here comes the most critical question. Offering the best placements on the world’s premium websites, Outbrain must be quite expensive to work with. Or not?
In fact, an average Outbrain campaign will cost you less than most traditional paid advertising campaigns. The minimum spend for a campaign here is $20 per day, which is lower than Verizon Media Native and Taboola require.
The minimum cost per click is $0.03, but you won’t win an auction bidding this low. The Outbrain team suggests choosing a value between $0.80 and $1.00 for desktop and $0.40 – $0.60 for mobile. Starting with higher bids, you’ll be more competitive and get more traffic that will allow you to analyze your strategy effectiveness. After the launch, you can always adjust your bidding strategy and lower or increase bids.
Outbrain vs Taboola
These top native advertising platforms had been competing for quite a long time – up until the announcement of their merger in October 2019. The transition process will take a year or so, and meanwhile, advertisers will still be using these two platforms separately.
It’s hard to tell which one is the best, as the choice of the right native ad platform highly depends on your goals, preferred targeting options, or publishers you want to target. While Taboola and Outbrain are similar in multiple ways, we should say Outbrain campaigns are usually easier on the wallet.
However, if you want to scale your high-performing campaigns, using the combination of these two platforms can be extremely beneficial. The quality of incoming traffic and available features are quite similar, and this means that working with both Taboola and Outbrain, you’ll double your reach without taking an extra effort. To learn more about how to work with Taboola, check out our guide on launching your first Taboola campaign.
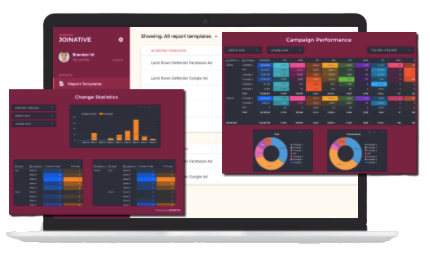
Not to export performance reports from both platforms every time, we recommend that you sign up for Native Pro. This reporting & optimization platform integrates with Taboola and Outbrain, allowing you to access combined performance reports from one dashboard. Check out how to make the most of native advertising reporting and find our advertising templates in our recent blog posts.
Want to get the most out of Outbrain campaign reporting?
Access advanced reporting features and customize Outbrain performance data with Native Pro.
How to set up your first Outbrain campaign
Now when we described what Outbrain is and listed its main benefits, let’s look into how to use Outbrain. And of course, it all starts with the account setup.
Account creation
If you haven’t done it yet, creating your Outbrain account will take less than a few minutes. All you need to do is to enter your contact information. Unlike the Taboola account setup process where you have to add payment details before you get access to your account, here you aren’t required to fill in any billing information at this stage.
Overview dashboard
Once you have access to your Outbrain account, you’ll see the following dashboard.
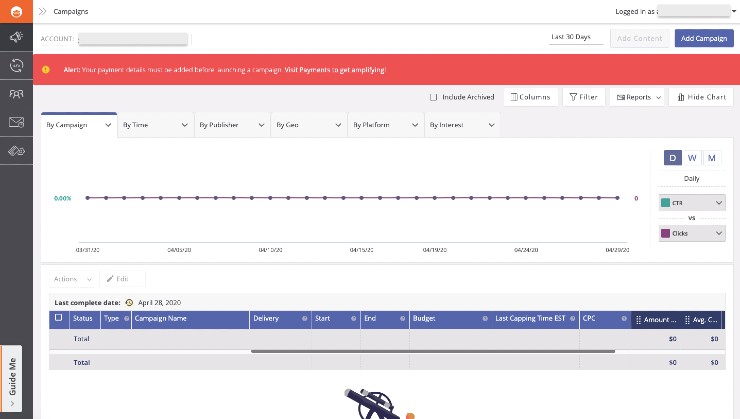
Here you see a reminder to add your payment details, so now is the right time to do that. Just click on ‘Visit Payments to get amplifying!’ and follow the instructions.
After you launch your first campaigns, you’ll be able to see the performance curve by different parameters, such as campaign, carousel, country, day of the week, etc. You can also use this chart to compare specific metrics, e.g. impressions against clicks. This will allow you to understand how these curves correlate in time and whether there are any performance surges you should pay attention to. Below this chart, there will be a table with the most critical data per campaign.
But let’s proceed to the campaign setup first.
Outbrain campaign setup
To start, click on ‘Add Campaign’ in the right upper corner.
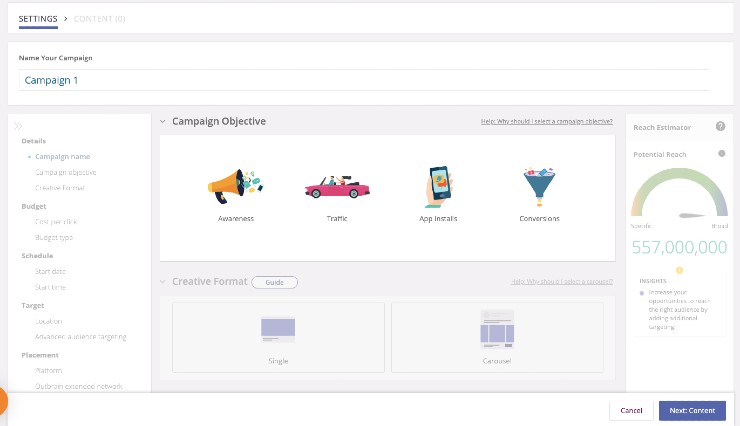
As usual, you should select your campaign goal in the very beginning. Your goal will not only determine your future KPIs but also affect the bidding strategy Outbrain will apply for your campaign.
When your campaign objective is brand awareness or traffic, your campaign will automatically optimize towards clicks. If you aim at driving app installs or conversions, your campaign objective will automatically optimize towards conversion within the bidding strategy.
Next, you’re offered to select the creative format. You can choose between a traditional single ad or a carousel ad. We’ll go with a carousel format to show you how these types of ads are created. Except for a little difference at the stage of defining campaign content, the whole campaign setup process doesn’t differ from the one you’d go through to create a traditional ad.
Bid strategies
As has already been said, your bid strategy is predefined by your campaign objective.
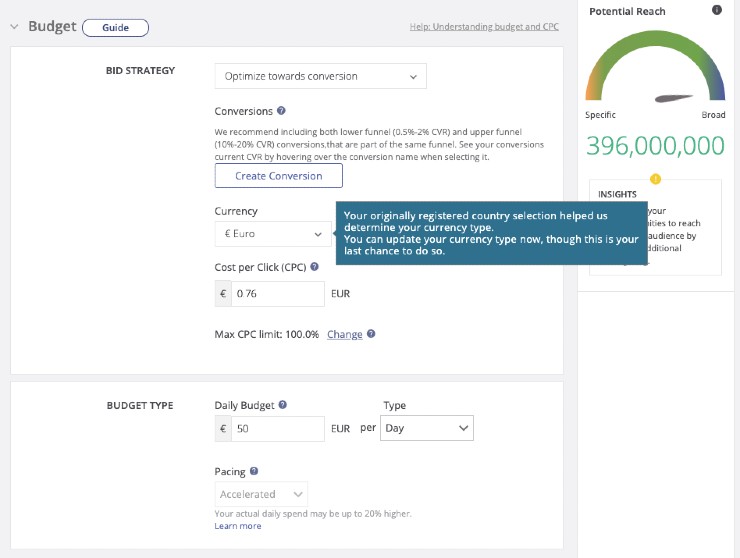
What does ‘optimize towards conversions’ mean?
The conversion-driven strategy means Outbrain will dynamically optimize your campaign CPC to make your offer more competitive for websites where the audience is most likely to convert. When a website doesn’t have great potential for conversions, the platform will bid less.
As for the CPC, we’ve already mentioned you’d better start with a competitive bid and reduce it later. When you start seeing your campaign has been capping its daily budget too fast for a few days in a row, you can start lowering your CPC gradually. Keep monitoring your performance to make sure you continue to cap your budget on a daily basis and keep moving towards reaching your goals.
Budget types
There are three budget types available: daily, monthly, and campaign budget (for this type, you’ll need to define the campaign end date or set a recurring budget). When setting a campaign or monthly budget, you can also select pacing that will determine how fast your budget will be spent.
Pacing
Before you select one of three pacing types, let’s figure out how it works.
Standard pacing. The Outbrain system will pace spending evenly until the end of the month.
Accelerated pacing. Outbrain will pace spending as quickly as possible, and it’s most likely that your monthly or campaign budget will cap before the end date. This type of pacing is applied to the daily budget type by default.
Daily Target. You can specify the amount of spend from the monthly or campaign budget you’re ready to allocate for each day.
Note: Once your budget has capped, your ads will no longer be shown to new audiences. However, a user can still click on an ad that was displayed before your budget has capped. As a result, Outbrain may charge you up to 20% more than your actual budget is.
Schedule
The Outbrain team recommends that you create your campaign a week before the expected launch date. First of all, it can take up to one day for the team to review your campaign. Also, this might give you some time to address issues in case your ad isn’t approved.
Outbrain targeting options
Outbrain offers diverse targeting options. You can choose to reach wide audiences, attract highly qualified leads, or access your prospects. Whatever goal you set, Outbrain targeting options allow you to optimize towards your desired objectives.
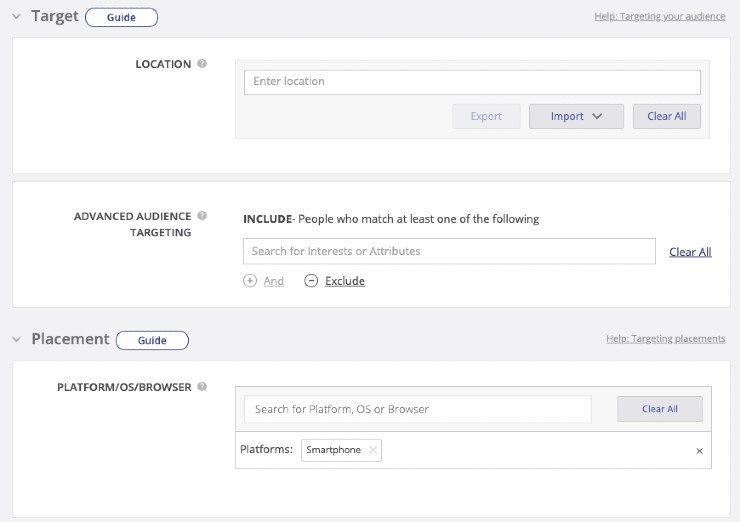
Location-based targeting
You can target your audience based on country or postal codes (the import feature is available). For your first campaigns, we recommend that you combine geo-targeting with device targeting described below and narrow down your reach gradually.
Platform targeting
In the placement section, you can choose the device type, operating system, and browser(s) your ads will be available for.
Outbrain’s algorithms prioritize mobile traffic over desktop traffic. Therefore, it’s highly recommended that you separate mobile and desktop campaigns.
Splitting your campaigns by device, you can evaluate your performance accordingly and allocate your budget more effectively.
Advanced audience targeting
Advanced audience targeting allows you to specify the target audience segment based on their topics of interest. Here you can either access interest targeting where data provided by Outbrain is used or go with attribute targeting available due to third-party data. However, whether this approach is effective or not highly depends on your geolocation.
Note: If you select attribute targeting, third-party data fees will be added to your CPC.
The Reach Estimator on the right side of the menu tells you how many people you might reach if you go with the selected targeting options. Make sure to keep an eye on it when going for more advanced targeting settings. Unless you’re running a retargeting campaign, these estimates shouldn’t go below 500,000 if you want your campaign to deliver tangible results.
Custom audiences
Last but not least, custom audiences. If you want to retarget your website visitors, target campaign clickers, or create lookalike audiences, you should switch to the Audiences section.
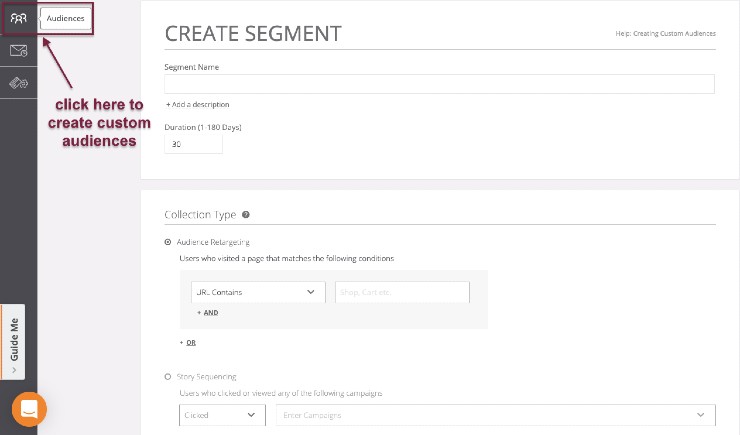
Here you can create audience segments that will later be available from your campaign settings menu.
To create a new audience segment, you need to implement the Outbrain pixel into your website. Copy your pixel code from the Conversions tab of your Outbrain dashboard, paste it in the header of every page of your site. Test its functionality with Outbrain’s Pixel Tracker. Here’s a step-by-step guide to setting up the pixel.
Once the pixel code is implemented, proceed to add audience segments. Depending on your goals, you can create audience retargeting, story sequencing (to target campaign clickers), and converters segments (the latter will help you re-engage with people that have converted previously).
Learn more about how to create and configure custom audiences in this guide from Outbrain.
Ad creation
Next, we need to add campaign content.
Mind that your headlines and images should be relevant to the linked content. Otherwise, you might either fail to entice people to click on your ads or, on the contrary, deliver tons of clicks that will never convert. Promising something you won’t deliver is an inefficient and dangerous practice.
Regardless of the chosen ad format, once you click on the ‘Next: Content’ button, you’ll see the following tab:
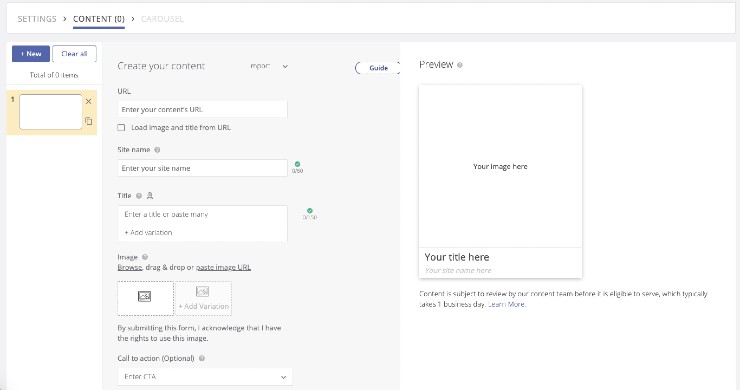
Here you need to insert your landing page URL(s) and your site name, add headlines and images, and select the CTA. To find best-performing combinations and focus on them, be sure to upload 6-8 headlines and images for each URL.
If you add a few variables of images and headlines, make sure to add the right URL for every ad created. Although you can add different URLs within one campaign, try not to test too many pages at once.
To enable you to test your ads and find the best possible combination, Outbrain mixes every single headline with a new image. So, if you add 3 images and 3 headlines for one campaign, there will be 9 ads available. You can always remove odd combinations.
When you’re ready, click on Launch Campaign and wait for your campaign to be reviewed by the Outbrain team.
So how do you create carousel ads?
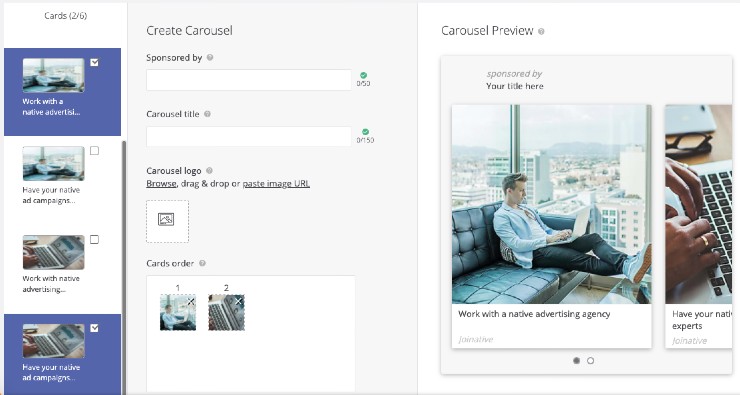
If you select the carousel format, you’ll need to take one additional step before launching your Outbrain campaign. In the Carousel section, you need to select which cards from the ones that have been created in the previous step will be included in your carousel. Choose them, fill in empty fields, and launch your campaign.
Outbrain content policies
It won’t hurt to repeat that Outbrain has strict content policies. Not to spend your time finding and fixing issues that might have prevented your ads from getting approved in the future, check out their guidelines before launching your campaign.
Outbrain campaign tracking
It’s crucial that you track your campaigns regularly once they’re live. Ideally, your conversion pixel will be recording every conversion, and you’ll access this data in your performance reports.
But it’s often hard to say whether the platform’s conversion tracking is precise enough. We recommend that you also extract data with Google Analytics (along with using the conversion pixel). In this case, you’ll have enough data to make informed decisions.
To track conversions with GA or your custom BI solution, you need to properly utilize UTM parameters in your campaigns. You can either go with a UTM builder or use the one Outbrain recommends:
https://yourdomain.com/landingpage?utm_source=Outbrain&utm_medium=Discovery&utm_campaign=your_campaign_name&utm_content={{ad_title}}&utm_term={{publisher_name}}_{{section_name}} – where yourdomain.com/landingpage is the URL of the page you want users to land on.
The parameters {ad_title}, {publisher_name}, and {section_name} will be replaced dynamically with your ad title and publisher source information.
Check out our guide to set up server-to-server conversion tracking for Outbrain.
To access more informative reports on your Outbrain campaign performance, check out our native advertising reporting tool. With Native Pro, you can level up your Outbrain reporting. Along with allowing you to configure and export reports, the tool gives you access to unique reporting opportunities:
- Assign labels to ads or campaigns you’re testing to extract and analyze the performance data easily;
- Set up flexible optimization rules and define performance alert triggers to stay on top of your campaign performance;
- Upload conversions from your internal tools to compare them against the platform’s conversions and consider all the data at your disposal;
- Create conversion tags to group or single out conversion events, and more.